Spring - 줌 OAuth API 연동하기 3
2023. 1. 18. 16:54ㆍJava/Spring
반응형
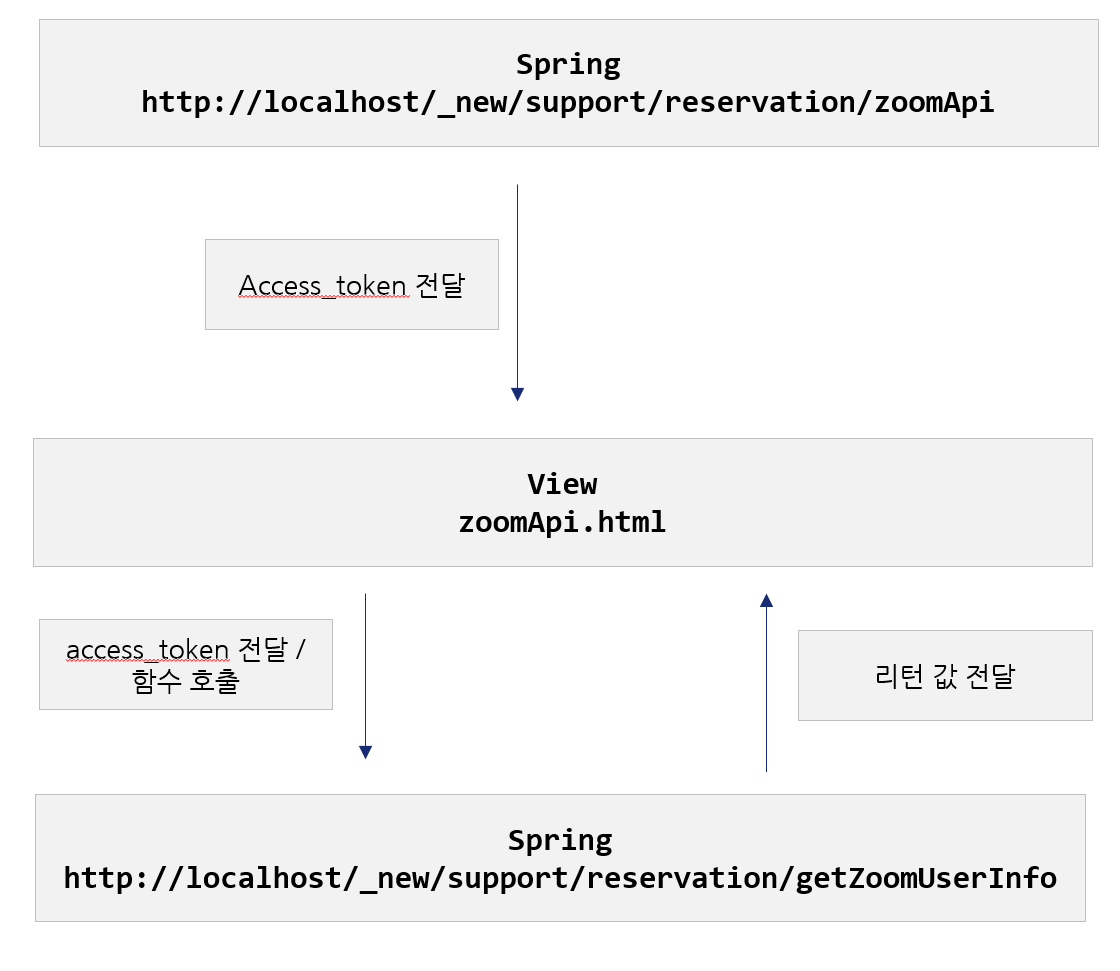
아래와 같은 방법으로 access token을 주고 받으며 통신 할 예정이다.

상황에 따라 java-java 바로 refirect 통신도 가능하다.
호출 가능한 api 정보는 아래 문서에서 확인 가능하다
https://marketplace.zoom.us/docs/api-reference/zoom-api/methods/#operation/users
https://marketplace.zoom.us/docs/api-reference/zoom-api/methods/#operation/users
marketplace.zoom.us
대표적으로 select, update 하나씩을 만들어보자
1. select
우선 view에서 아래와 같이 javascript 함수를 작성한다.
<input type="hidden" id="access_token" th:value="${response.access_token}"/>

function getUserInfo(){
	var access_token = $("#access_token").val()
	$.ajax({
		type: "POST",
		contentType: 'application/json',
		url : "/_new/support/reservation/getZoomUserInfo",
		data: JSON.stringify({"access_token":access_token}),
		dataType: "json",
		cache: false,
		//traditional : true,
		timeout: 60000
	})
	.done(function(data, textStatus, jqXHR ) {
		console.log(data)

	})
	.fail(function(jqXHR, textStatus, errorThrown ) {

	})
	.always(function(jqXHR, textStatus, errorThrown ) {
	});

}
java쪽에서 아래와 같이 작성한다.
@PostMapping("/getZoomUserInfo")
	@ResponseBody
	public ResponseEntity<?> getZoomUserInfo(HttpServletRequest req,@RequestBody Map<String, Object> map, Model model) throws IOException {
		String zoomUrl = "https://api.zoom.us/v2/users/me";
		OkHttpClient client = new OkHttpClient();
		ObjectMapper mapper = new ObjectMapper();

		Request zoomRequest = new Request.Builder()
		        .url(zoomUrl)
		        .get()
		        .addHeader("authorization", "Bearer " + map.get("access_token"))
		        .build();
		   Response zoomResponse = client.newCall(zoomRequest).execute();
		   String zoomText = zoomResponse.body().string();
		   mapper.configure(DeserializationFeature.ACCEPT_SINGLE_VALUE_AS_ARRAY, true);
		List<Object> list = mapper.readValue(zoomText, new TypeReference<List<Object>>() {});

		Map<String, Object> Resultmap = new HashMap<String, Object>();
		Resultmap.put("result", list);
		HttpHeaders headers = new HttpHeaders();
		headers.setContentType(new MediaType("application", "json", Charset.forName("UTF-8")));
		return new ResponseEntity<>(Resultmap, headers, HttpStatus.OK);
	}
본인의 정보를 select 해서 조회하는 코드다.

GET, POST, DELETE, PATCH 등 종류가 있다.
해당 종류에 맞게
Request zoomRequest = new Request.Builder()
		        .url(zoomUrl)
		        .get()
		        .addHeader("authorization", "Bearer " + map.get("access_token"))
		        .build();
.get() , .post 등을 작성한다.
2.update
동일하게 view에서 호출 함수를 작성한다.
function updateUser(){
	var access_token = $("#access_token").val()
	$.ajax({
		type: "POST",
		contentType: 'application/json',
		url : "/_new/support/reservation/updateUser",
		data: JSON.stringify({"access_token":access_token}),
		dataType: "json",
		cache: false,
		//traditional : true,
		timeout: 60000
	})
	.done(function(data, textStatus, jqXHR ) {
		console.log(data)

	})
	.fail(function(jqXHR, textStatus, errorThrown ) {

	})
	.always(function(jqXHR, textStatus, errorThrown ) {
	});

}
java쪽에서 아래와 같이 작성한다.
@PostMapping("/updateUser")
	@ResponseBody
	public ResponseEntity<?> updateUser(HttpServletRequest req,@RequestBody Map<String, Object> map, Model model) throws IOException {
		String zoomUrl = "https://api.zoom.us/v2/users/유저이메일";
		OkHttpClient client = new OkHttpClient();
		ObjectMapper mapper = new ObjectMapper();
		ObjectMapper obm  = new ObjectMapper();

		Map<String,Object> temp = new HashMap<>();
		temp.put("type", 1);
		String userListStr = obm.writeValueAsString(temp);
		okhttp3.MediaType JSON =  okhttp3.MediaType.parse("application/json; charset=utf-8");
		okhttp3.RequestBody body =  okhttp3.RequestBody.create(JSON,userListStr);


		Request zoomRequest = new Request.Builder()
		        .url(zoomUrl)
		        .patch(body)
		        .addHeader("authorization", "Bearer " + map.get("access_token"))
		        .addHeader("Content-Type", "application/json")
		        .build();

		   Response zoomResponse = client.newCall(zoomRequest).execute();
		   String zoomText = zoomResponse.body().string();
		   mapper.configure(DeserializationFeature.ACCEPT_SINGLE_VALUE_AS_ARRAY, true);
		   System.out.println("zoomText :: " + zoomText);
		   List<Object> list = mapper.readValue(zoomText, new TypeReference<List<Object>>() {});

		Map<String, Object> Resultmap = new HashMap<String, Object>();
		Resultmap.put("result", list);
		HttpHeaders headers = new HttpHeaders();
		headers.setContentType(new MediaType("application", "json", Charset.forName("UTF-8")));
		return new ResponseEntity<>(Resultmap, headers, HttpStatus.OK);
	}
이전과 다르게 patch에서 파라미터를 보내야 한다. 파라미터는 body 형식으로 만들어서 전송해야하며,
필요한 값은 공식 문서에 필요한 값이 정의 되어있다.
대부분의 기능은 위 두가지 양식으로 통신이 가능하다.
이상 Zoom - spring 연동 끝~!
반응형
'Java > Spring' 카테고리의 다른 글
| Spring - 줌 OAuth API 연동하기 2 (0) | 2023.01.18 |
|---|---|
| Spring - 줌 OAuth API 연동하기 1 (2) | 2023.01.18 |
| Spring - Ajax 사용하여 이미지 , 파일 업로드 구현하기 (feat. AWS S3) (0) | 2021.05.17 |
| Spring - 구글 로그인 구현하기 -2 (0) | 2021.05.12 |
| Spring - 구글 로그인 구현하기 -1 (0) | 2021.05.11 |